Tuesday, December 29, 2009

Homemade Broth makes Chicken Divine

No, this cheesy deliciousness is not something Mom would approve of. Even though there is broccoli in the dish, I'm pretty sure that if it's made invisible by a layer of caloric goodness, all of its nutritional value also is canceled out. But I did do something Mom would approve of while making Chicken Divine: I used the bones of the rotisserie chicken that I shredded to make homemade chicken broth.

Believe me, I'm really not getting all high and mighty on myself. I once went to Costco with Mom and she basically forbid me from buying frozen chicken breasts because they're too expensive compared with buying whole chickens and cutting them up yourself, which is what she does. But that's not what I do. The few times Bryan and I tried cutting up a chicken, we had to call ex-butcher Charlie or refer to a book, and we still didn't do it right. So now I just make sure to buy my frozen chicken breasts and thighs, as well as rotisserie chickens, when Mom's not around. And as a consolation (to my guilty conscience), I make broth out of the bones.

It's nothing fancy. I just cover the bones, skin and fat with water and cook it in the Crock-Pot overnight, then strain the chunks and skim the fat after it cools in the morning. But compared with store-bought broth, the flavor is amazing. Somehow, Mom's is about a billion times better. It's probably because she uses a thermal cooking pot, which I would recommend to anybody who makes soup more than once a week. But dang, are they hard to find in America.

Anyhoo, I'm still going to share the recipe for Chicken Divine, which I got from Heather years ago and have made for countless people since then. It's a crowd-pleaser, so enjoy!

Chicken Divine
1-1/2 c. uncooked jasmine rice
2 cooked chicken breasts, shredded (or about 4 c. shredded rotisserie chicken meat)
2 broccoli heads, cut in bite-size pieces
Family-size can of cream of chicken soup
1 c. mayo
1-2 T. curry powder
1-2 T. lemon juice
2 c. cheddar cheese
1/4 c. bread crumbs

Preheat oven to 350 degrees F. Cook rice according to package directions. Spray 9-by-13-inch pan with cooking spray, then layer with rice. Cover with shredded chicken, then broccoli.

Mix chicken soup, mayo, curry powder and lemon juice, then pour on top of casserole. Top with cheddar cheese and bread crumbs. Cook for 35 minutes, or until bubbly and top is brown.

Monday, December 28, 2009

Keeping the hubby happy with Grandma's recipes


This is fun. Not only do I get to ruin my mom's recipes, but now I also get to ruin Bryan's mom's recipes. I suppose I could have watched Connie make Bryan's favorite childhood dish, Seafoam Salad. Better yet, I could have helped her make it. But I had better things to do on Christmas Eve, like watch holiday movies on Chiller. Hey, we don't get that station. That's a good enough excuse, isn't it?

I have a better excuse. This was the first Christmas I have had the chance to celebrate in Bryan's hometown since we first started dating in the early part of this waning decade. I'm not going to say that I'm happy to be out of the newspaper industry, but there certainly are aspects of it I'm never going to miss. Like having to work nearly every single holiday, or at least enough of the surrounding days that holiday travel was impossible.

So getting laid off has had its benefits, that's for sure. For once, I didn't have to work, trying to squeeze in a meal with family after an exhausting day, or to even cook a harried holiday meal on or in between work days. For once, I got to put my feet up and enjoy a week that much of the nation has off every year of their lives. So thank you, to my wonderful inlaws, for giving me that week of relaxation.

Oh, so you came here for a recipe, not to hear me make up excuses for my laziness?

Well, here you go. A holiday classic from Bryan's Grandma Dorothy:

Seafoam Salad
15-oz. can pears in heavy syrup
4-oz. package lime jello
8-oz. package cream cheese, softened
12-oz. can evaporated milk, thoroughly chilled

Drain pears, reserving syrup. Mash pears and set aside. Heat syrup to boiling, then add to the lime jello, stirring to dissolve. Gradually beat in softened cream cheese. Stir in mashed pears. Chill until almost firm (about 30 minutes).

Beat evaporated milk until soft peaks form. Fold whipped milk into pear mixture. Chill at least six hours before serving, preferably overnight.

Saturday, December 5, 2009

Cheesecake is so not about the crust

Maybe one of these days I'll actually use the fancy springform cheesecake pan my aunt and uncle got us for our wedding 2-1/2 years ago, but until then, premade crusts in disposable dishes it is.

They may not be pretty, but they sure are useful. I suppose I'd care more if I actually enjoyed eating crust, but all I'm ever really going for is what's in the middle. As far as I'm concerned, the crust is just there to hold it all together. And besides, it's so much easier to bring to a party because then I don't have to worry about my pan at the end of the evening.

Excuses, excuses. I really did consider making a pretty cheesecake this time, but when I saw that most recipes for the pans call for four bricks of cream cheese, I decided 32 oz. of fat and cholesterol was a bit much for a potluck dessert party.

Oh, come on, if I really cared about my friends, I'd make something like a cranberry-orange nut loaf. But I'd really rather just hear them compliment the cheesecake recipe that was handed down to me from Dad's mom, to my mom after she came to this country more than 40 years ago, that then became a staple at all of our holiday events, and became one of the first recipes I mastered. (Except for the one time when I made the cheesecake at Mom's house, and the "vanilla" was actually sesame oil because she's all about reusing, but not about relabeling. Bryan will never let me live that one down. Thanks, Mom.)

UPDATE: I have just been informed that the recipe isn't actually from Dad's mom, but from his sister, my Aunt Cindy. She says: "I got it from my 1969 Better Homes and Garden Cookbook (wedding gift typical of that era and before) and have been baking it for 40 years!!! It is always a hit and loved by everyone who has tried it."

Cheese Cake
8 oz.-package cream cheese
1/2 c. plus 2 T. sugar
1 T. lemon juice
1 t. vanilla, divided
Dash salt
2 eggs
1 c. sour cream
Graham cracker crust

Preheat oven to 325 degrees F.

Soften cream cheese, then beat until fluffy. Blend in 1/2 c. sugar, lemon juice, 1/2 t. vanilla and salt. Add eggs, one at a time while beating. Pour into crust.

Cook for about 50 minutes. While cheesecake is in oven, prepare the topping. Mix sour cream, 2 T. sugar and 1/2 t. vanilla. Alternatively, use only 1/2 c. sour cream, then add 1/2 c. fruit of your choice.

Spoon topping on top of cooked cheesecake. Bake for 10 more minutes.

Friday, December 4, 2009

Dry roast beef gets drenched in risotto

Maybe trying out a new recipe on a huge slab of meat from Costco wasn't such a good idea. I figured, roast beef is so juicy in the middle, so how could I go wrong? Oh, but I forgot, drying out meat is something I excel at, regardless of the cut. The flavor was there, but the texture. ... Usually, being devout carnivores, Bryan and I don't have a problem devouring 5 pounds of flesh in a few days, but this time I had to get creative. The gravy just wasn't cutting it.

So with the weather flirting with freezing and the threat of snow just hours away, I turned to our most beloved soul-warming and hearty meal, risotto.

I realize the plate is a little bare. Thankfully Mom doesn't actually read my blog. But going to the store for salad or some other green fare just seems like such a chore when the weather is so cold. I even had to get creative with the broth since I didn't actually have any. Instead, I soaked the mushrooms in 4 c. of water and used that. I also added about 1/2 c. of my remaining gravy, and it turned out wonderfully if you'd prefer that route. Assuming you don't just have gravy lying around, I'll give you the recipe made with broth.

Risotto with Roast Beef and Wild Mushrooms
0.88-oz. (25 g) package dried wild mushrooms
2 c. boiling water
1 T. olive oil
1-1/2 c. chopped onions
2 garlic cloves, minced
1-1/2 c. arborio rice
1/2 c. red wine
2 c. beef broth
2 c. roast beef, cut in 1/2-inch cubes
Salt and pepper, to taste
Parmesan cheese to garnish

Place the dried mushrooms in a bowl and pour the boiling water over them. Cover and let sit for 15 minutes.

Drain the liquid from the mushrooms into a saucepan with the beef broth, heat to almost boiling and keep warm. Chop the drained mushrooms if they're in big chunks, then set aside.

Heat a stockpot to medium-low, then add olive oil. Cook onions and garlic for about 4 minutes, until soft, then add the arborio rice and stir for another 4 minutes. Add red wine and let simmer until liquid is absorbed. Then add the heated mushroom and beef broth mixture in 1/2 c. increments, waiting to add more broth until all the liquid is evaporated. This is important. Don't stop stirring. Hopefully you have a Bryan who loves the meal so much, he'll stir the whole time!

When you add your last ladle of broth, throw in the mushrooms and steak. Add salt and pepper to taste, and serve with freshly grated Parmesan cheese.

Saturday, October 24, 2009

A crowd-pleasing peanut sauce


Last night Bryan and I were trying to get in the holiday spirit by watching "Night of the Demons." After all, who can resist a cheesy '80s horror flick when Halloween is just a week away?

During the ultra-cheesy character development in the beginning, the heroine's mom was mercilessly teased because she always makes the recipes on the backs of cereal boxes. Why does everybody always have to diss compulsive recipe clippers? If I see a recipe that looks good, I clip it, no matter where I find it: on the back of a cereal box or any other food product, with the Sunday coupons, and really, anywhere in the newspaper or online. And then I feel like I have to lie about where I got the recipe if anybody asks. What, it's not from "Mastering the Art of French Cooking" or "How to Cook Everything"?

Well, I may be somewhat of a food snob, but at least I'm not a recipe snob. However, I can't lie about the success rate with my compulsive clipping habit. I've had about as many misses as hits, but there's always room to improve any recipe. And besides, the repeat performers make up for all the not-so-tasty meals, plus you only know whether something is good if you try it.

And today was definitely a hit. Christina asked me to bring my crowd-pleasing guacamole to her daughter's 2nd birthday party, but I wasn't quick enough to play the avocado-ripening game. So I found a peanut-sauce recipe in Parade magazine last weekend that I figured would do the trick, especially considering that I'd been promising her peanut sauce for years, and that half of our friends are vegetarians.

I adapted the recipe a bit, including using green onions instead of bean sprouts because I'm scared of E. coli. So I'll share my adapted recipe and hope the magazine doesn't sue me.

Noodles with Peanut Sauce
1/4 c. plus 2 T. peanut butter
1/4 c. plus 1 T. soy sauce
1-1/2 T. sugar
1 T. warm water
2 T. sesame oil, divided
1 T. rice vinegar
1 t. garlic-chili sauce
1-inch piece ginger, minced or grated (use a Microplane! It's the bomb!)
3 cloves garlic, minced
1 T. sesame seeds
1/2 pound spaghetti
1/2 pound fried tofu*
2 pickling cucumbers, cut in slivers
1/2 red pepper, cut in slivers
about a dozen snow peas, thinly sliced across
1/2 c. chopped green onions

Mix the peanut butter, soy sauce, sugar, water, 1 T. sesame oil, vinegar, garlic-chili sauce, ginger and garlic in a food processor or blender. Mix the cooked spaghetti with the tofu and remaining 1 T. sesame oil. Add the peanut sauce and sesame seeds and mix well. Place in serving bowl, then sprinkle the vegetables on top.

*The original recipe calls for shredded chicken, boiled in 6 c. salted water with 1 clove garlic and 4 slices ginger. I also made it one night with about a 1/2 pound of cooked shrimp, which was superb.

Note to fellow party-goers: I accidentally doubled the amount of noodles, which is why they weren't very saucy. I know you like it that way, Sakina, so go ahead and use the entire package of noodles! But the rest of you might actually want to follow the recipe a little more closely than I did.

Wednesday, October 21, 2009

Pot roast warms the autumn chill


Last week when I thought I had swine flu (but what I now think is just the autumn allergies I always forget about), all I wanted was to curl up with some comfort food. I asked Bryan to make me a pot roast, but he didn't think he was up to the challenge.

We scoured "The Taste of Home Cookbook" that his mom got me for my birthday, and found a recipe for Maple Pot Roast that served two and that we also could make in the few hours that we had. But I just wasn't satisfied. The dish served two, and I'm sorry, but pot roast is something that you're supposed to have as leftovers for days. And throughout the week I started to feel better, but as the weather kept getting grayer and grayer, pot roast beckoned yet again.

For the second time around, instead of a sweet roast, I went the spicy route and made an adapted version of the Cajun-Style Pot Roast from the same book. I think I should have turned the Crock-Pot off after 6 hours, because it ended up a little dry, but the delicious sauce makes up for it! Don't hold back on the cayenne seasoning if you want it a little spicier.

Cajun-Style Pot Roast
1 boneless beef chuck roast (2 to 3 pounds)
4 cloves garlic, minced
1 t. cayenne pepper
1 t. basil
1 T. olive oil
1 14.5-ounce can diced tomatoes
2 7-ounce cans diced chiles
1 medium red pepper, chopped
1-1/2 c. chopped celery
10 pearl onions
1/4 c. cup quick-cooking tapioca
3 cloves garlic, minced
1 t. salt

Mix together 4 cloves minced garlic, cayenne and basil, and rub all over roast. Pour olive oil in non-stick skillet heated to medium-high and brown roast on all sides. Transfer to a 5-quart slow cooker.

Combine the tomatoes, chiles, red pepper, celery, pearl onions, tapioca, 3 cloves of minced garlic and salt; pour over roast. Cover and cook on low for 6-8 hours, or until meat is tender. Slice and serve with rice.

Thursday, October 15, 2009

Thai Cashew Chicken for those lazy days


The family gathered over at Mom's a couple of weeks ago for the annual fall birthday bash, and my brother was harping at me for not taking any photos of all my favorite dishes. Um, sorry, but I take my birthday off!

Alas, birthday week is now over, culminating with a fun-filled weekend in Vancouver, B.C., where we ate delicious Franco-German fare at La Brasserie and drooled over our Pannekoek and DeBakon at De Dutch. I will be back, Vancouver!

And then I had to come home with what I'd like to think is the swine flu but considering that all I have is a stuffy nose, not only am I probably not immune to H1N1, but also I am hardly ill enough to excuse myself from cooking.

However, that doesn't mean I have to torture myself over the stove. No, this week, I stuck with easy yet pleasing dishes such as this recipe adapted from SKOALZ on Allrecipes.com:

Thai Cashew Chicken
1/4 c. soy sauce
1/4 c. fish sauce*
1-1/2 T. garlic-chili sauce
3 cloves garlic, minced
1 T. grated ginger root**
4 skinless, boneless chicken breasts, cut into thin strips
1 T. sesame oil
3 T. brown sugar
1 small onion, thinly sliced
3/4 c. water
3 T. creamy peanut butter
1 cup raw, unsalted cashews (available at Trader Joe's)

Combine soy sauce, fish sauce, garlic-chili sauce, garlic, ginger and chicken in a resealable plastic bag and marinate for at least two hours or as long as overnight.

Heat the sesame oil in a large skillet over medium heat, then add brown sugar and stir for a couple of minutes. Add the onion and cook until tender, about 5 minutes. Reserving the marinade, add chicken to skillet and cook for about 10 minutes. Add the marinade and water and let simmer for another 10 minutes.

Meanwhile, heat another skillet and toast cashews until brown and fragrant.

When chicken is cooked through, stir in the peanut butter and serve over jasmine rice topped with the toasted cashews.

*The first time I made this dish, I asked Mom what kind of fish sauce to get. Her only advice, don't buy the cheap stuff. Go too cheap, and your whole house will smell like rotten fish. Remember that.

**I just got Microplane graters for my birthday from my mother-in-law (Thanks, Connie!), and I swear, nothing compares when it comes to grating ginger root. Greg Atkinson knows what he's talking about!

Thursday, October 1, 2009

Enchiladas Verdes -- the easy version


I think I've finally perfected this recipe I clipped years ago from The Seattle Times' Pacific Northwest magazine.

The first time I made it, I'm pretty sure it took all day, but with a little prep work and a few less steps, it's just a minutes-long process now.

First of all, I bought a rotisserie chicken and shredded it a day in advance, and I also bought a few jars of Trader Joe's cilantro-free Salsa Verde instead of slaving away over chiles. I swore the last time I made a chile verde sauce from scratch that I would never do it again, and I will stick by that rule. It is so not worth the effort when you can buy pre-roasted, deseeded and skinned peppers for the same price.

So all that left was the delicious beans, which took less than a half-hour, then fry up the tortillas, make the three-deck enchiladas, throw them under the broiler and don't catch your oven mitt on fire like I did!

Thursday, September 17, 2009

P.F. Mai Ling's Spicy Eggplant with Chicken


When it comes to going out for Chinese food, I'm about as snobby as you can get. It's pretty much International District, or you're going to see some disgusted looks on my face. So what if I act like a child? I'm just spoiled by Mom's cooking!

But the truth is, I love it when my girlfriends plan a date at P.F. Chang's. Not that I'm admitting they necessarily serve real Chinese food, but they do a good job of making everything so darn attractive and tasty. Actually, I really wouldn't know about everything, because I always order the same thing when I go there: Ground Chicken and Eggplant. I suppose I ventured from my usual fare a couple of times, but I always go back to this dish because it's so close to perfection. Finally, I decided I should try to make it myself. So I scoured the Web, but the closest I came to was this recipe on CDKitchen.

I made a few changes, and although it's still not as sweet and saucy as P.F. Chang's version, it's probably better for me this way.

Spicy Eggplant with Chicken
2 boneless, skinless chicken breasts
2 T. soy sauce
1 t. red wine vinegar
1/2 t. sugar
2 t. garlic chili paste
3 T. vegetable oil, divided
1/2 t. salt
1 lb. Asian eggplant, cut in bite-sized chunks
2 cloves garlic, minced
1-1/2 T. grated ginger
2 scallions, chopped and divided
1 t. sesame oil
1/2 c. chicken stock
1 t. corn starch
2 T. Hoison sauce

Pulse chicken in a food processor until it's ground. Move to bowl and stir in soy sauce, red wine vinegar, sugar and garlic chili paste. Cover and refrigerate for 2 hours.

Heat a large skillet over medium-high heat, then add 2 T. vegetable oil and salt. Cook eggplant for about 5 minutes, until soft, then remove from skillet.

Place remaining 1 T. vegetable oil and sesame oil in pan. Cook garlic, ginger and half the scallions for about 30 seconds, then add the marinated ground chicken and stir until cooked through. Stir chicken broth and corn starch together, then add to skillet and stir quickly until evenly distributed. Add Hoison sauce, the remaining scallions and cooked eggplant, and mix well.

Serve with rice.

Wednesday, September 16, 2009

Roasted bell peppers make the pasta sauce

I can't be the only one out there who simply can't stomach jarred spaghetti sauce. I'd rather open up a can of crushed tomatoes and simply heat it with some olive oil, garlic and red pepper flakes. There's something about the flavor that is so, oh, I don't know, I guess artificial.

If I have a little more time to spend on the sauce, though, my favorite thing to add is roasted bell peppers. Previously I've used a recipe that has you halve plum tomatoes and roast them for an hour at 375 with a red bell pepper and an entire clove of garlic wrapped in foil. The garlic part I'm a big fan of, but I think I might actually prefer simply using a can of tomatoes. Some people might think you're sacrificing flavor, but it's so much easier -- not to mention skinless.

Here's my new favorite pasta recipe. It makes enough for about four generous helpings that require bread to slop up the extra:

Roasted Bell Pepper Sauce
3 red, orange or yellow bell peppers
1/2 onion
14.5-ounce can tomatoes
3 T. extra-virgin olive oil, divided
2 cloves garlic, minced
1/2 t. kosher salt

Heat grill on high. Rub 1 T. olive oil on the cut side of the olive. Leave the skin on. Place onion cut side down on grill along with whole bell peppers. Check peppers every 5 minutes and turn to char the entire pepper. Turn the onion once or twice while peppers are cooking. When peppers are blackened and onion is soft, remove from grill. Place peppers in a bowl and cover with plastic wrap.

After vegetables are cool enough to handle, chop the onion, then remove the skin and seeds from the peppers and chop them. Place onion, peppers and tomatoes in a food processor and pulse until the sauce is well blended.

Heat 2 T. olive oil over medium-high in a skillet and cook garlic for about a minute. Add sauce and salt, and cook until heated through. Mix with your favorite pasta, and serve with fresh Parmesan.

Wednesday, September 9, 2009

Let the roll-making begin


You now how most people, when they get a bread machine, it just goes in their garage and gathers dust until they decide to sell it at a garage sale? Well, that's not me. I don't remember how I got obsessed with the idea of making bread, but right before I made my first loaf from scratch, Mom offered to give me her bread machine instead.

I was always anti the square loaves, until my friend Chelsea, who's a trained chef with impeccable taste, convinced me that they're not so bad. Pretty much any food-related item that Chelsea gives her stamp of approval to becomes good enough for me that easily. I am so gullible.

So began the obsession with baking break. It started with the recipes that came with the bread machine. But then I came across Beth Hensperger's "The Bread Lover's Bread Machine Cookbook," and I think it might have been love at first sight. I started making the recipes from front to back, then I got sidetracked by a few and now I'm all over the place. But I never strayed from loaves.

OK, I sculpted a few lopsided pizza crusts and calzones that started off in the bread machine, but I was really scared of anything having to do with cutting the dough into chunks. Rebekkah Denn once tried to convince me that cinnamon buns are easy to make after I marveled at her ability to make these overnight rolls and take care of her two children, but to no avail.

However, last night, I didn't really have a choice when Bryan came home with a delicious-smelling smoked port butt from his SouthPaw BBQ buddy. Well, I suppose I could have gone BACK to the store to get hamburger buns, but who wants to go to the grocery store twice in a day? That is just silly. It makes much more sense to just decide on a whim at 5 o'clock at night to make hamburger buns from scratch.

Oh my gosh, it was so easy! Why have I been scared of dough my whole life? I suppose it has to do with Mom's countless failures at getting it to rise, but that's when the bread machine comes in handy. The rest just takes a gentle touch and a lot of flour.

Now take a look at this scrumptiousness ...

Monday, September 7, 2009

The closest you can get to grilling risotto

As if we're going to let a little rain keep us from grilling. It is Labor Day weekend after all. Aren't barbecues a required event to see off summer?

And besides, I can't resist all the sale items that just beg for the grill. Yes, that's Mom's fault. She even called me this week specifically to tell me about a certain sale on steak and was trying to buy me an extra package to put in my freezer. I do not need extra packages of steak hanging out in my freezer. That just sounds like trouble. Not to mention that I'm gluttonous enough on my own, since I bought a package with three HUGE steaks in it -- and I spent a good hour the last two days pondering how I could use the third one on Day 2 without making another trip to the store.

Then it came to me: one of our favorite dishes, risotto, but this one I'd make barbecue style. We marinated the steaks overnight using Mom's recipe, but this time I added a mutant-sized clove of garlic that was equivalent to about three. Cooking in advance for the risotto meal, I threw an onion and a red bell pepper on the grill, using extra-virgin olive oil infused with garlic and sun-dried tomatoes that Mom made in her dehydrator (and grew in her garden!). And I made an extra ear of corn for the risotto, too, with the infused olive oil, salt and pepper rubbed all over it and cooked in foil over the flames.

Barbecue Steak Risotto
4 c. beef broth
2 T. olive oil
2 cloves garlic, minced
1 c. arborio rice
1/2 c. white wine
1 grilled onion, chopped
1 grilled red bell pepper, deseeded, skinned and chopped
1 grilled ear corn, cut off cob
2 green onions, chopped
1 lb. leftover grilled steak, cut in bite-sized chunks or strips
Parmesan cheese for garnish

Heat broth in a medium sauce pan and keep on low heat while you make the risotto.

Heat a second larger, heavy-bottomed pan over medium heat, then add olive oil and garlic. Cook for 30 seconds, then add arborio rice and stir for 2 minutes. Add wine and let simmer until wine is absorbed. Gradually stir in broth in 1/2 c. increments, waiting for the liquid to be absorbed before adding more broth. Stir frequently -- a wooden spoon with a long handle works best. When all the broth has been used (this usually takes about a half-hour), add onion, pepper, corn and green onion, and continue stirring until heated through. Add the steak and continue stirring until heated through. Add salt and pepper to taste, and serve with Parmesan cheese on the side.

Saturday, September 5, 2009

If money's tight, try Chicken Gizzards


Even though Mom slaved over the barbecue and made us steak and ribs this week, some of the simplest accompanying dishes that she made are some of my favorites. I could eat this trio nightly and be happy: Stir-fried Chinese Broccoli, Chicken Gizzards and Spare Ribs.

I see you grossing out over the Chicken Gizzards, but I've been eating them my whole life - since long before I knew that not everybody thinks of them as the delicacy that they are.

If you like dark meat on chicken, there's no reason you won't like gizzards. And besides, they're cheap and this recipe is easy, so why not give it a try?

By the way, if you're a cilantro fan, Mom usually puts some in unless she remembers her hater daughter is coming over. Yes, for those of you who don't know, I hate cilantro with a passion and Mom tends to forget that because I think it literally pains her. She seems to think that Asians are genetically programmed to like cilantro, and that something is seriously wrong with me.

Since she and I are the only ones who eat the gizzards in the family, you'd think she'd remember to at least leave it out of the one dish she's making especially for us to share. But the last time she served me gizzards she'd put cilantro in them, and of course I took one bite and I knew. Needless to say, she was not happy that I wouldn't eat our special dish. I figured she learned her lesson. I guess she kinda did, though, because this time after she put cilantro in the gizzards, she remembered my cilantro hatred and washed each individual gizzard with a only mother's love. But my supertaster taste buds could still taste the devil's weed, and I couldn't indulge like I usually do. Poor Mom. Denied by her hater daughter.

Well, give this recipe a try. And let me know if you prefer it with or without cilantro!

Chicken Gizzards
1 pound chicken gizzards, washed well
1-2 t. sesame oil
2 scallion, cut in 1/2-inch pieces
1 clove garlic, minced
1 T. soy sauce
1-1/2 t. sugar

Heat sesame oil in a medium-sized sauce pan over medium-high heat. Add garlic and scallion, and cook for 2-3 minutes. Add gizzards, soy sauce and sugar, and mix well. Cover and cook over low heat for about 30 minutes, until gizzards are cooked through.

Monday, August 31, 2009

40 pounds of peaches canned in a day


Why, oh why, did Mom never teach me how to can? I remember eating jars and jars of canned peaches and pears when I was growing up, but I can't remember ever seeing Mom actually doing it -- although I do remember her later saying she would never do it again.

I think I'm going to get her to start up again. After all, I will need a partner to get started after taking a daylong lesson over the weekend at my friend Leslie's house. Plus, Mom lives closer to the rural parts of the county where you can actually come out ahead when you can, unlike us city folk who can end up spending an arm and a leg to "save money" on canning.

So what did we can? Forty pounds of peaches and 5 pounds of green beans!!! I suppose to people who actually can regularly, that's nothin'. Our instructor, a mutual friend with whom Leslie once worked and I went to college, said she normally cans 100 pounds in a day. And she has two children. And I have no excuses! Well, I still have yet to buy the equipment, but I'm hoping Costco will have it all in a big package in honor of the season the next time I go. Or maybe I'll just hit up some estate sales or look on Craigslist.

The class was wonderful, though. Laura and our other instructor, Kathy, gathered herbs in bulk (the only way to buy, apparently!) for us to use as we desired in our peaches and pickled green beans. I used a piece of vanilla bean, a couple of cardamon pods and a cinnamon stick in my peaches; and I got two jars of green beans: a spicy one with probably too many hot peppers, basil and garlic; and one to share with my friend Nicole, who can't handle spicy food, with just dill and garlic. Can't open them for at least a month, so if you're lucky, I'll come back with a full report.

I finally tried the peach jam today on an English muffin and it was absolutely heavenly. Looks like Leslie is responsible for yet another hobby in my overhobbified life!

Thursday, August 20, 2009

Battle of the peach pies


Now this was the Peach Pie I wanted to make for Mom's birthday party. Isn't it beautiful? I know, I should have taken a shot of it after it was actually baked, but I couldn't find the right lighting (it's the only excuse I can think of!).

So here's the saga. I found this great recipe that ran in the Seattle P-I three years ago that I always wanted to make, and after Nicole served me some delicious peach pie last week, I knew I had to finally give it a whirl.

But unfortunately, I went to the local Asian store, HT Oaktree Market, for my supplies. Technically it's an "ethnic" store, which I should be the first to admit since I went there to buy the usual: Mexican food. Well, sometimes I get Asian food there, too! But no, usually it's Mexican food fixins.

Anyway, since Stephen doesn't have a grill, we decided tacos would be nice and easy for the 13 people (including three, count 'em, three teenage girls) that would be eating at his house. I made another P-I recipe: Mexican Pulled Pork, and he sauteed some spiced-up chicken with garlic and onions to go with all the expected fare: cole slaw (with a little chipotle), a few homemade salsas from Stephen (we'll have to ask him for the recipes), tomatoes, cheese, sour cream, lettuce, refried beans, Mai Ling's Guacamole (ask nicely and maybe I'll share) that actually was devoured before the tacos were served, a billion different kinds of tortillas, and I'm sure I'm forgetting a few special details. Alas we hadn't considered that maybe the Asian side of the family wasn't very familiar with tacos ... but hey, let's be honest, some of the stuff I eat at their house I'm pretty unfamiliar with, too!

Needless to say, there were some leftovers. But there wasn't any leftover pie, and talk about an ugly pie. Why, you ask?

Well, I know I should make my own pie crust, but somebody's got to keep the Pillsbury Dough Boy alive. So I sought him out at the HT Mart, but all I could find were crappy frozen crusts. Nor could I find the vanilla bean needed for Hsiao-Ching Chou's recipe. So I thawed out my frozen crusts and searched my unphotographic memory for the recipe Nicole had used when I was at her house: six peaches, 1/3 c. flour, 2/3 c. sugar and 1/4 t. cinnamon. Turned out fabulous ... but ugly. Using a frozen crust, no matter how thawed out it is, simply cannot look good on top of a pie.

Obviously, it didn't matter to the eaters, so I shouldn't care, but I just had to prove that I could make it pretty.

So later in the week, I got my standby Pillsbury refrigerated crusts and set out to make this beaut. Okay, here's the disclaimer. It was totally soupy!!! I think maybe the peaches were too ripe, if that's possible. Or maybe I didn't bake it long enough? Or maybe the beautiful crust is to blame, because unlike the first crust that expelled half the peaches' juices, this one kept 'em all in. Soupy, sure, but dang, did it taste good. Here's the P-I's recipe, from "The Baker's Dozen Cookbook":

Vanilla Peach Pie
3/4 c. packed light or dark brown sugar
3 T. all-purpose flour (I wouldn't hold it against you if you added a little more, just in case!)
1/2 t. ground cinnamon
Pinch of salt
1-inch piece vanilla bean, split
7 ripe medium peaches, peeled pitted and cut into 1/4-inch-thick slices
1 T. fresh lemon juice
Butter Pie Dough or Cream Cheese Pie Dough (or Pillsbury!!!)
1 T. unsalted butter

In a medium bowl, mix the brown sugar, flour, cinnamon and salt. Using the tip of a knife, scrape out the tiny seeds from the vanilla bean and add to the mixture. The pod can be saved for another purpose or discarded. Add the peaches and lemon juice and toss.

Fit the dough into a 9-inch pie pan. Fill the shell with the peach mixture and dot with butter. Trim the overhanging dough to a 1/2-inch overhang. Center the remaining dough over the filling. Fold the top crust under the edge of the bottom crust and pinch together firmly to seal. Crimp the dough. Cut a few slits in the top crust to allow the steam to escape. Place the pie on a baking sheet and refrigerate for 15 minutes.

Meanwhile, position a rack in the bottom third of the oven and preheat to 375 degrees.

Bake the pie for 10 minutes. Reduce heat to 350 and continue baking until the crust is golden brown and the peaches are tender when pierced through a slit with the tip of a knife, 50 minutes to 1 hour.

Cool 1-2 hours before cutting.

Monday, August 10, 2009

Late night eating in the ID


And we thought we were being so clever by taking the bus to the Sounders vs. Barcelona game on Wednesday. Ha!

Oh, it probably was better than trying to drive through the mayhem, but we sure as heck didn’t want to stand in line at the bus stop for an hour. Nor did we want to struggle with the drunks in Pioneer Square. So we instead headed to the International District to see if anything was open where we could grab a bite to eat.

If only we'd paid a little closer attention. Just that weekend The Seattle Weekly had published an article about the "Ragin' Asian" scene in Seattle that keeps ID restaurants open until as late as 3:30 a.m. Unbeknownst to us, we could have gone to any number of restaurants within minutes of the ID bus station, but luckily the place we found turned out to be a real gem.

What led us there was a sign on King Street that Bryan thought said Noodles, so we walked toward it and saw the sign actually said Models. No worries, though, because right next to it was a cafe that really did say noodles and it had people in it, so we ended up at the Homestyle Hong Kong Cafe.

I was not disappointed. The menu was full of congee and different kinds of noodles and other dishes. But I saw congee and there was no turning back. There was a moment when I was wondering if it was appropriate to order congee at night, since it's typically something Mom serves in the morning, but then I saw "real" Asians ordering it so I figured I was good to go!

When the congee, which I ordered with preserved duck eggs and pork, arrived I was so excited it didn't cross my mind that since the congee was sizzling, the stone pot it was in was probably even hotter. Um, ouch. So watch out for the bowl, but do get the congee if rice cooked into mush sounds like something you would like.

My former Seattle P-I co-worker, Hsiao-Ching Chou, who has gone on to do much bigger and better things in the foodie world, includes some instructions on making congee here, but stay tuned for Mom's. She told me once how she makes it and it made my head spin. It's supposed to be a simple meal, but of course Mom turns in into a gourmet masterpiece. And people wonder why I fear cooking Chinese food!

I do think I'm going to try to bring Mom to the Homestyle Hong Kong Cafe someday, even though she hates eating out. Let somebody else make the congee for once!

Sunday, July 26, 2009

Camping with some gourmet style

I'm really getting the hang of this gourmet camping thing. I remember the first time Bryan and I used our plastic camping wine glasses: I had votives lit all over the campsite, and this couple walked by and complimented how lovely our site looked. I've never forgotten my wine glasses since!

We like to camp in style, and lucky for us, so do most of our friends. Salami, cheese, crackers, grapes and even some nuts make pretty much the best snack indoors or out, as far as I'm concerned! We even picked up some garlic and herb cheese curds at the Poulsbo Farmers Market that went oh so nicely with my cheap white wine!

For our first night of dinner I marinated some steaks using Mom's Barbecue Steak recipe. Of course, I took one bite of it and said, "This isn't as good as Mom's," to groans from the rest of the group who said it was delicious. And it really was, but I do think I'll use a little less soy sauce and a bit more Worcestershire sauce the next time I make these steaks.

Julie grilled them to perfection, along with some grilled corn on the cob that Andrew spiced up for us and some potatoes thrown in the coals. I fixed them up Mom-style (she ALWAYS fixed up our baked potatoes for us, and I wish to emulate that extreme act of Momness) with butter, sour cream and some onions Veronica chopped up for me.


The steaks were so big, we even had an extra one that we wrapped in foil and I devoured the next day while everybody else was eating sausages. Selfish? Perhaps, but I did share!


Monday, July 20, 2009

Maybe I should look at the recipe next time

I learned a valuable lesson last night. It's much easier to not ruin Mom's recipes if I actually bother to look at them first.

Yesterday I marinated some country-style pork ribs to make my uncle's Chinese Barbecue Pork. When it came time to put them on the grill, I opened up my cupboard and saw a jar of Char Siu Sauce (aka Chinese Barbecue Sauce), and I panicked. I was sure I'd messed up the recipe so I had Bryan put that sauce on instead of the Hoison sauce, which not only does the recipe call for, but it's also what the pork had marinated in all day.

Well, it turns out the two sauces don't have that different of a flavor, so it still turned out delicious. But no, it's not as good as Mom's since I, of course, ruined it!

I did not, however, ruin my own recipe for my favorite grilled veggie, zucchini. Well, one of my favorites, but since it's so easy, it's often on the grill.

Grilled Zucchini
4 zucchini, cut in 1-inch pieces
2-4 T. extra-virgin olive oil
1 t. sea salt
1 t. Mrs. Dash Garlic Seasoning
1/2 t. freshly ground pepper

Mix all ingredients in a bowl, then place cut side on grill heated to medium high. Turn when zucchini starts to brown and grill marks show up on zucchini, about 5 minutes. Cook other cut side until brown and zucchini is soft, about 5 more minutes.

Toss Zucchini in same bowl, then serve.

P.S. Doesn't Bryan look cute behind the grill?

Friday, July 17, 2009

Dim sum-style green peppers

Do you love dim sum but hate the greasy feeling in your gut later on? Yeah, me neither, but Mom really does. As a matter of fact, I have to fight tooth and nail to get her to meet me in the International District, even though secretly I know she likes the food.

Now I have proof. You know those Stuffed Green Peppers they serve at dim sum restaurants, usually they have shrimp in them and they come with a sauce on top? Well, Mom made a heart-healthy and superdelicious version that sounds like it just might be easier to make. Instead of shrimp, which is packed with cholesterol, she used chicken and pork. And we did without the salty sauce. However, if you decide to make this, I wish you luck in finding the pickled mustard. In case you didn't already figure this out, I would suggest looking for it at some sort of an ethnic store.

Peppers Stuffed with Pork and Chicken
1/4 pound chicken breast, trimmed of fat and cut in chunks
3/4 pound boneless country-style pork ribs, trimmed of fat and cut in chunks
1-inch piece of pickled mustard, cut in chunks
1 T. soy sauce
1 T. vegetable oil
2 t. corn starch
1 t. sugar
2 Pasilla peppers, seeds removed and deveined

Pulse chicken, pork and pickled mustard in a food processor until it's ground like hamburger meat. Move to a bowl, then add the soy sauce, vegetable oil, corn starch and sugar. Let marinate in the fridge for a couple of hours.

To prepare the peppers, cut each in half lengthwise, then cut again widthwise so you have four somewhat equal pieces. Then you'll want to cut appetizer-size pieces lengthwise so that they each are about two inches wide.

Spoon some of the stuffing in each of the pepper pieces until it's all used up. Heat a nonstick frying pan over medium-high heat. Pan-fry the peppers with the meat down for a few minutes, then turn them to cook the green side. Repeat the process until the meat is brown and cooked through, and the peppers are brown and soft, about 10 minutes.

And here's what we had with the peppers. No salt, no seasonings, just grilled tilapia. Yes, it's looking at you!

Tuesday, July 7, 2009

Smoked ribs to warm my home


Honestly, I do want to apologize to all my vegetarian friends out there. I swear, I do not eat huge slabs of meat for dinner every night. I even used to be a vegetarian! But now that I'm back on the meat, it's all I want in the summertime. Meat off the grill, meat on a stick, meat on a bun, you name it.

Anyhoo, for those of you who live in the area, you may have noticed that after the perfect Fourth of July weekend, the weather is no longer quite as ideal for barbecues. Just in time, Bryan got a rack of smoked ribs that spent enough time in the coals to only need a warm-up in the oven. Kept me from having to turn on the heat (I'm kidding!)!

And where did Bryan get this rack of ribs? His colleague, who participates in barbecue competitions under the name SouthPaw BBQ, made them for us in one of his many weekend practice runs for the mere price of cost. Cooking on Monday nights has never been easier! Check out the smoker SouthPaw cooks with and other photos here.

We did an informal taste test with Mom's Barbecue Ribs, and really, with such a unique, smokey flavor, there's simply no comparison. The smoker definitely makes the meat a bit drier, but I really like the way it falls off the bone, whereas I kind of have to gnaw it off Barbecue Ribs. On that note, I can't say I've ever had a bad homemade rack of ribs, so maybe I'm not the best judge.

After the last few experiences with SouthPaw, Bryan and I talked about buying a smoker. But I think a lot of the flavor in their meats comes from their experience and the rub they use. Besides, I was eavesdropping on the bus the other day and heard somebody raving about a smokehouse on our route, Jenson's Old-Fashioned Smokehouse. I finally stopped there last week and I do believe that place will soothe my craving if SouthPaw goes to the big time and we lose our connection.

Monday, July 6, 2009

Steak is great, but so is life

What doesn't kill us only makes us stronger.

So when Mom makes three pounds of the most delicious steak that Charlie cannot eat, it only makes him stronger. Of course, he says he doesn't want to eat it anyway, but when I take a bite of the juicy deliciousness (sorry, the photo was an afterthought and it shows!), I have my doubts about his honesty. Especially since the meal was a belated Father's Day gathering.

At least now we know he'll be around for many more.

Mom's Barbecue Steak
3 pounds tri-tip steak
1/2 c. soy sauce
1/4 c. (or less) water
1 t. (or less) sugar
1 t. chili garlic sauce
1 t. Worcestershire sauce
Juice of 1 lemon
1/4 c. white wine (optional)

Marinate overnight, and turn often to distribute marinade evenly.

Turn grill on high, and cook about 5 minutes per side after grill is sizzling hot.

Like I said before, it's all about the heat!

Julie also wanted me to share the recipe for Mom's awesome Potato Salad. I make it all the time and only Chelsea seemed to like it, but maybe it's more of a hit than I suspected. Some people aren't fans of hidden fruit in their potato salad, but it helps reduce the amount of mayo you need, so I suppose that could be considered a healthy compromise.

On that note, Mom didn't add any salt to her Potato Salad last night, and it still tasted great. However, I usually add kosher salt, Lawry's Seasoning Salt and a little freshly ground pepper (and sometimes a few slices of cooked bacon chopped up!). So as usual, make yours to taste!

Potato Salad with Apples and Pineapple
4 medium to large potatoes, peeled and cut in bite-size chunks
2 hard-boiled eggs, chopped
1/2 sweet onion, chopped
2 stalks celery, diced
2 baby dill pickles, diced
1 apple (she used Fuji but isn't particular), chopped
1 small can pineapple tidbits
1 T. mustard
2 T.-1/4 c. mayonnaise

Mix all ingredients and chill before serving.

Tuesday, June 23, 2009

Halibut with Thai curry passes the test

Mom's the kind of person you simply avoid cooking for. Everything's too greasy, too creamy, too cheesy, etc. But there are a few dishes that actually pass the Mom test, and very few of them are easy to make.

However, I can share one dish that is relatively simple, and it also happens to be one of the first that made me actually feel like a success in the kitchen. It might have still been too creamy for her taste, but it had to have been good enough, or everyone at the table would have known.

I first found the recipe in Bon Appetit back in October 2004 in the "Readers' Favorite Restaurant Recipes" section. I looked up the restaurant, Eartha's in Saratoga Springs, N.Y., but its Web site is down and there's very little new info. Guess I'll just assume the worst in this economy. But thank you, Eartha, for this delicious dish! Anyhoo, I seem to be unable to now locate the recipe on Epicurious, so I guess I'll just have to type out my cellophane-covered recipe (how geeky but yet intelligent is that?).

A few notes about the recipe. I am now channeling Mom when I say, "4 tablespoons of butter?!" One or two tablespoons are more than enough, really. I mean, who ever heard of bok choy and butter anyway (it's actually quite tasty, which I can admit since Mom doesn't read my blog because she can't stand to look at "the box")? And also, I had a hard time finding yellow curry paste until I found a huge tub of it at Uwajimaya. So let me know if you'd like to borrow some! Oh yeah, and as you may have noticed from the picture, I forgot the green onion tops. I always forget the garnish! And lastly, if you're looking for nice halibut but don't want to pay Whole Food prices, I got my cut at Costco and it was quite perfect.

And here's what you've been waiting for:

Roasted Halibut With Shitake and Bok Choy in Thai Curry Sauce
1 13.5-ounce can unsweetened coconut milk
1/2 c. low-salt chicken broth
1 T. yellow curry paste
1 T. curry powder
1 T. (or more) fresh lemon juice (optional)
2 T. vegetable oil
4 6- to 8-ounce halibut fillets (about 1-inch thick)
4 T. (1/2 stick) unsalted butter
1-1/2 pounds shitake mushrooms, stemmed and sliced
1 pound baby bok choy, leaves separated from core
1 cup chopped green onion tops

Preheat oven to 450 F. Bring coconut milk, chicken broth, curry paste and curry powder to simmer in heavy large saucepan over medium heat. Simmer until sauce thickens enough to coat spoon, whisking occasionally, about 3 minutes. Add lemon juice to taste.

Heat vegetable oil in heavy large nonstick ovenproof skillet over high heat. Sprinkle halibut with salt and pepper. Add fish to skillet and sear until browned, about 3 minutes. Turn fish over and place skillet in oven. Roast fish until just opaque in center, about 8 minutes.

Meanwhile, melt butter in heavy large nonstick skillet over high heat. Add mushrooms and saute until beginning to brown, about 5 minutes. Reduce heat to medium-high. Add bok choy; saute until leaves begin to wilt and stems soften slightly, about 5 minutes. Season vegetable mixture to taste with salt and pepper.

Spoon 1 tablespoon curry sauce onto each of 4 plates. Top with vegetable mixture, then fish. Spoon remaining sauce over fish, sprinkle with green onions and serve.

Thursday, June 18, 2009

We eat this lemony goodness for Dad

Mom makes more than just spectacular Chinese food. She also makes a mean Lemon Meringue Pie. Of course, that’s a recipe passed down from my dad’s mom, a recipe that was one of his absolute favorites. Along with anything else that was lemony, or sugary …


Anyway, the last time Mom made one, he-who-will-not-be-named accidentally destroyed the entire meringue so we had to make a new one at my house. (Was it really his fault considering the pie was haphazardly placed in a plastic grocery bag?) And, despite the fact Mom probably hadn’t made this pie for at least five years before this particular morning, she had the entire recipe memorized.


Needless to say, I didn't watch carefully enough, because my meringue turned out a little less stiff than it should of. But it still tastes mighty fine. Hey, practice makes perfect!


We eat this pie in honor of my father, who we lost 13 years ago today. Be sure to eat it with some Talking Heads or Oingo Boingo in the background, and maybe a motorcycle hanging out in your living room.


Lemon Meringue Pie

1 9-inch pie crust

1-1/2 c. plus 4 T. sugar

1/3 c. flour

1/3 c. corn starch

1/2 t. salt

2 c. boiling water

1/2 c. lemon juice

1 T. lemon zest

3 eggs at room temperature, separated


Poke holes in pie crust with fork and bake at 450 Fahrenheit until golden, about 10 minutes.


Mix 1-1/2 c. sugar, flour, corn starch and 1/2 t. salt in a pan. Slowly pour in boiling water and cook at a slow boil until thickened. Remove from heat, then add lemon juice and zest. Mix, and add egg yolks.


To make meringue, mix egg whites until soft peaks form. Add 4 T. sugar and a dash of salt. Gently pour meringue on top of pie, then create peaks with a knife.


Bake at 400 for about 10 minutes, until meringue peaks turn golden.

Wednesday, June 10, 2009

Turn up the heat, really high

Apparently, the key to Chinese cooking is the smoke. Maybe that's why my stir-fry never tastes as good as Mom's! I'm scared to turn the temperature past medium-high, but the smokey flavor is where it's at. Mom shows you how it's done.

No, that's not steam, it's smoke that filled the whole house for about 15 minutes. And all she did was slice up a couple of tomatoes, sprinkle them with salt, then push them around in canola oil for a couple of minutes in a REALLY HOT cast-iron skillet. Too hot even for olive oil, she says. To top it off, she threw in a handful of fresh chives from her garden to absorb some of the tomatoes' juices for a tasty garnish.

Less scary are the veggies she grilled along with her much-loved Barbecue Chicken, which I should add she always serves boneless, because she cuts the meat off so she can use the bones to make homemade chicken broth. The woman is a nonstop cooking machine, I'm telling you!

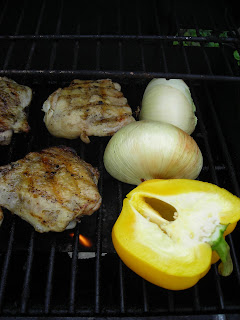
Anyway, back to the veggies. Sick of your onions and peppers falling through the grill? Try Mom's trick: Cut sweet onions and bell peppers in half, making sure to leave the skin and ends on to keep them from falling apart. Sprinkle them with a little salt and olive oil, and put them on the grill for about 10 minutes on medium heat, but check often and turn when necessary. Mom turned the heat off and let them sit a little bit longer, so they weren't too charred, but were instead nice and mushy. Peel the skin off the onion and cut it in quarters, then cut off the membrane of the pepper and serve it in thick slices. Yummy goodness. A simple meal packed with flavor!

Monday, June 8, 2009

Sweet & Sour recipe a blast from the past

I dropped by to see my parents this weekend and was greeted by looks of confusion when I told them I'd finally started the blog about Mom's cooking. Once again, I started explaining what a blog is, then they figured out what I was talking about and Mom rushed into the other room. Then she handed me a photocopy of a recipe from Charlie's days as a real estate agent.

Smart guy. Instead of offering Popsicles or whatever it is agents usually offer at open houses, the smell of freshly cooked Chinese food wafted out of the houses he was showing. And one even included a recipe for her Sweet & Sour Pork, and as a bonus featured a cute picture of Mom in her Safeway uniform (?).

It's sure a sign of the times. Besides the fact Mom's hair is now much shorter and has been for, oh, I'd say 10 years, she also doesn't really deep-fry anything anymore. Maybe some calamari or egg rolls for special occasions, but otherwise oil is very taboo these days.

Meanwhile, Charlie's been urging Mom to write a cookbook for years, so I hope he can at least be happy with this blog. Unfortunately, it's unlikely to make any of us any money, but perhaps we'll at least make some friends with it!

Here's the recipe (plus a few copy editing tweaks) just in case the jpeg isn't quite clear enough.

Sweet & Sour Pork
3/4 lb. boneless pork
2 T. dry sherry
Salt
Freshly ground black pepper
1 T. cornstarch
1/2 c. water
1 T. ketchup
5 T. sugar
1 T. soy sauce
2 t. red wine vinegar
Oil for deep frying
3 T. oil
1 green pepper, cored, seeded and thinly sliced *
1/2 onion, sliced into rings *

Batter:
2 egg yolks
2 T. all-purpose flour
2 T. tablespoons water

Garnish:
3-4 lemon slices
Sliced carrots
Onion rings *

Cut pork into strips. Sprinkle with half of the sherry and a pinch each of salt and pepper. Mix the cornstarch with a little of the water, then stir in the remainder together with the ketchup, sugar, soy sauce, remaining sherry, vinegar and 1 t. of the salt.

Beat together the egg yolks, flour and water to make a smooth batter. Heat oil to 350 F. Dip pork into batter then deep-fry until golden brown. Drain and keep hot.

Heat 3 T. oil in pan. Add the green pepper and onion. Stir-fry for 2 minutes. Add the soy sauce mixture and cook, stirring, until thickened. Add the deep-fried pork strips and mix well.

Transfer to a serving dish and garnish with the lemon slices, topped with carrot slices and onion rings. SERVE HOT!!!

* Note from she who ruins Mom's recipes: This is an old recipe, so I don't know if Mom just cooks differently now or if she was trying to make the recipe easier to make. But now she would probably cut the onions into julienne strips and peppers into bite-size chunks, so about 2 inches. Also, I've never seen her garnish anything with onion slices, but feel free to do so if you like! Here's my attempt and Bryan and I both were not impressed with the raw onions on top. But everything underneath was fabulous!

Monday, June 1, 2009

The older the rice, the better it fries

The last time Mom made her Fried Rice for a party I was going to, everybody there wanted to know what the secret was. I know it sounds gross, but the secret is old rice. And since the rice we'd used was nearly a week old and had been drying out in a plastic grocery store bag in her fridge the whole time, I really wasn't kidding.

Of course, when my mom makes Fried Rice, it's one of those everything-but-the-kitchen-sink recipes. In addition to bacon, she also added a crumbled-up bratwurst, then cooked up some chopped celery, bean sprouts and sliced green onions with the other veggies. I would have added the same if I had the ingredients, but like her, I just use what's in the kitchen whenever I make Fried Rice.

So the following should be taken as more of a base recipe. Be sure to add any of your favorite ingredients: cooked chicken, Chinese sausage (yum!), water chestnuts, cooked carrots, bamboo shoots, baby corn, etc. And if you're going meat-free, just add a little more sesame seed oil or vegetable oil when you cook the veggies. And have fun!

Fried Rice
4 cups cooked rice (2 cups uncooked)
1 t. vegetable oil
2 eggs, scrambled
2 slices bacon, chopped
2 cloves garlic, minced
1/2 onion, chopped
1/2 bell pepper, chopped
1 c. frozen peas, thawed
2 t. soy sauce, divided
1 t. sesame oil, divided
1 t. salt, divided

Heat oil in nonstick skillet and cook scrambled eggs as you would an omelette. Flip when the bottom is done and try to keep it pretty. Remove from pan when done, then cut into bite-size strips after it cools.

Cook bacon over medium-high heat until crispy, then remove with slotted spoon to a paper towel-lined plate. Add onion to bacon grease and cook for 4-5 minutes. Add garlic and cook for 1 minute. Add bell pepper and cook for 3 more minutes. Add about 1/2 t. salt, then remove vegetables from skillet and set aside.

Put 1/2 t. sesame oil in skillet and cook put half the rice in the skillet. Smoosh it down a little with a spatula, and let it cook for a minute or two. Use a spatula and chopsticks to turn the rice over and smoosh it down some more. Keep cooking and turning for another couple of minutes until clumps begin to form, but don't let the rice burn. Add about 1 t. soy sauce and mix well, then set aside with cooked veggies and cook remaining rice in same manner.

Put everything - cooked veggies, rice, thawed peas, 1/2 t. salt, sliced eggs and cooked bacon - in the skillet and mix well. Add more soy sauce or salt to taste.

Chinese Barbecue Pork sans the red dye


Unfortunately, my mom is not the only chef in the family who doesn't believe in measurements. My aunt and uncle also fall into that category. They make a mean poor man's barbecue pork that I have tried many times to emulate, but so far I have been unsuccessful. It's still better than that stuff you can buy at the grocery store that is a scary red color and dry as a bone, though!

Here's my most recent rendition, which I tried this weekend and will be finishing off tonight with some fried rice. You can expect that recipe tomorrow.

4 pounds country-style boneless pork ribs
1 c. hoison sauce, divided
1/2 c. chicken broth
1 t. salt

Mix 1/2 c. hoison sauce, chicken broth and salt in a zip-top plastic bag. Add pork and marinate overnight.

Place on grill, then brush on remaining sauce as the pork continues to cook.

My aunt and uncle also cook this in the oven at 350 degrees, for about 30 minutes. I always use a meat thermometer, though, just to be safe.

Wednesday, May 27, 2009

Barbecue Chicken revisited

My brother was not impressed with my lack of an actual recipe for our mom's Barbecue Chicken marinade. After all, he is a voracious Alton Brown fan, which means he's also a fan of measurements and the science behind cooking. Good point, Stephen. And since this blog is called Ruining Mom's Recipes, and Mom didn't share with me the proportions she uses, I guess I'll just share mine and let you go nuts with it.

Mai Ling's Marinade for Barbecue Chicken and Pork Ribs
3-4 pounds chicken drumsticks/thighs
1/4 c. soy sauce
1 t. Mrs. Dash Garlic Seasoning, divided
1 t. garlic powder, divided
1/2 t. salt
1/2 t. pepper

Mix soy sauce and 1/2 t. each of Mrs. Dash Garlic Seasoning and garlic powder in zip-top plastic bag.

Wash and pat dry chicken, then place on cutting board or other large surface. Evenly sprinkle salt, pepper and remaining Garlic Seasoning and garlic powder over all sides of chicken. Place chicken in marinade and refrigerate for at least 2 hours or overnight.

Tuesday, May 26, 2009

Meet Mom - at her home outside the home

For years, I’ve been talking about putting together a book for friends and family full of my mom's beloved cooking. It’s been so long since I started gathering her tried and true recipes, that she’s changed her whole menu around and is now making different foods. But I still have my favorites. And I’ll still share them with you. However, instead of a book – or maybe in addition to one way down the road – I’ve decided that nothing but the public is better at keeping one on task. So, instead I’ll be blogging, sharing my trials and tribulations as I struggle with measurements as instructed from a woman who doesn’t believe in measuring. Yeah, it’s real fun. Needless to say, everything that follows is “to taste.” But please hold back on the sugar or my mom will blame me for sure!

So over the weekend, the Chinese side of the family gathered at Mom’s for a very late Mother’s Day. Long story, but we were supposed to take a road trip to celebrate together with my mother-in-law, then things didn’t work out, so it’s REALLY not my fault and I’m REALLY not a horrible daughter (even though I did let my mom cook her own post-Mother's Day meal ... )!

As usual, rain or shine, snow or sleet, Mom barbecued. But that's not all she did. When I talked to her the day before, she said she was tired because she'd spent the whole day painting the screen door, so she was going take it easy and make Lasagna of Roasted Butternut Squash (minus the salt and half the cheese, but just as tasty!). Oh, and some extra Pork Ribs she had from some other recent dinner party. Oh, and also a Rhubarb Pie because she had way too much rhubarb in the garden. Let me just say here, if I were going to make an easy meal, I would not make ANY of those things!


Anyway, I have yet to try my hand at her Barbecue Pork Ribs. I'm moving slowly toward it. Last week, I took a baby step and made her famous Barbecue Chicken, which uses the same marinade. Sure, it was good, but it was far from Mom good. I think her trick is marinating it overnight, instead of the measly four hours I planned for. Plus, she’s not as wary as I am of food poisoning, so she lets it marinate at room temperature for some of that time, which is also supposed to add more flavoring. Next time …

Sorry, she didn't give me measurements for the marinade, but I'll give you a hint: Soy sauce is the main ingredient!

Barbecue Chicken
Bone-in chicken
Soy sauce
Salt
No-salt seasoning of your choice (Mom uses Spike, I use Mrs. Dash Garlic Seasoning, but there’s no way that’s the secret ingredient!)
Garlic powder
Pepper

Mix ingredients to taste, then add chicken and let marinate for at least 2 hours, if not overnight. Grill and enjoy!

Mom doesn’t use barbecue sauce for her chicken, but she makes a great sauce for the Pork Ribs:

Barbecue Sauce for Pork Ribs
½ c. Char Siu Sauce
1 T. garlic chili sauce
1 T. oyster sauce
1 T. fresh lime or lemon juice
2 t. Worcestershire sauce

Play with these ingredients as you will. Don’t put it on until the last 5 to 10 minutes of cooking, otherwise you’ll just burn off the good stuff. Use the same marinade as for the Barbecue Chicken, but the ribs only need to marinate for a few hours.

By the way, the pie she made was delicious. It wasn't just a Rhubarb Pie, but a Rhubarb-Apple Pie, and she used a whole cinnamon stick in it. Genius.